Masih saja kosong
Go to Blogger edit html and find these sentences.Now replace these sentences with your own descriptions.
PROJECT I
Script menggabungkan link jadi satu
Script menggabungkan link jadi satu
<a href="javascript:(function(){window.open('');})()
;javascript:(function(){window.open('');})()
;javascript:(function(){window.open('');})()
;javascript:(function(){window.open('');})()
;javascript:(function(){window.open('');})()
;javascript:(function(){window.open('');})()
;javascript:(function(){window.open('');})()
;javascript:(function(){window.open('');})()
;javascript:(function(){window.open('');})()
;javascript:(function(){window.open('');})()
;javascript:(function(){window.open('');})()
;javascript:(function(){window.open('');})()
;javascript:(function(){window.open('');})()
;javascript:(function(){window.open('');})()
;javascript:(function(){window.open('');})()
;javascript:(function(){window.open('');})()
;javascript:(function(){window.open('');})()
;javascript:(function(){window.open('');})()
;javascript:(function(){window.open('');})()
;javascript:(function(){window.open('');})();">Open Link</a>
Cara Buka-tutup Chrome secara otomatis dengan Notepad Untuk dropshiper
Cara Buka-tutup Chrome secara otomatis dengan Notepad Untuk dropshiper
@echo off
cd "C:\user\lokasi file
start (nama file tanpa spasi)
timeout /t 8 >null
taskkill /f /im chrome.exe >null
Exit
Spesifikasi MSI H81M-E33
4th Gen Intel® Core TM / Pentium® /
Celeron® Processors
|
|
CPU Socket
|
LGA 1150
|
Chipset
|
Intel® H81 Express Chipset
|
Graphics Interface
|
1x PCI-E 2.0 x16 Slot
|
Display Interface
|
HDMI, D-Sub – Requires Processor Graphics
|
Memory Support
|
2 DIMMs, Dual Chanel DDR3-1600
|
Expansion Slots
|
1x PCI-E x1 Slot
|
SATA /mSATA
|
2x SATA 6Gb/s + 2x SATA 3Gb/s
|
USB Port
|
2x USB 3.0 + 8x USB 2.0
|
LAN
|
10/100/1000Mbps LAN
|
Audio
|
8-chanel (7.1) HD Audio
|
Printer Epson L355 It is time to reset the ink levels
Printer Epson L355 It is time to reset the ink levels
Penyebab :
Canon G2000 Support Code 1471 / Blink 5x
 |
 |

Canon G2000 Support Code 1471 / Blink 5x
Penyebab :
- Cartridge Error
- Kabel Flexible Rusak
- Ganti dengan yang normal
- Bongkar dan Cek kabel flexible ( Putus/ Kemasukkan Tinta ), jika rusak ganti dengan yang masih normal.
Cara Mengembalikan Data Yang ke Format Pada Hard disk / Flashdisk dengan aplikasi EaseUS Data Recovery Wizard 6.1
- Download aplikasi EaseUS Data Recovery Wizard 6.1 terlebih dahulu.
- Instal aplikasi tersebut sampai selesai.
- Buka Aplikasi EaseUS Data Recovery Wizard 6.1.
- Klik Partition Recovery.
- Klik Next.
- Pilih Drive yang datanya akan di kembalikan → Klik Next.
- Cari dan Pilih data yang akan di kembalikan → Klik Recover.
- Masukkan Serial Number yang ada didalam file aplikasi tersebut → Klik Activate.
- Pilih Lokasi yang akan di gunakan untuk menyimpan data tersebut → Klik Save.
- Data telah kembali.
Tutorial Gambar ↓↓↓
Cara Membuat Gambar Membesar Saat Terkena Kursor
Cara Membuat Gambar Membesar Saat Terkena Kursor
- Masuk ke blog.

- Klik Tema

- Edit HTML
- Cari kode <head>,
- Agar lebih cepat tekan Ctrl+F → cari kode tersebut.

- Copy kode berikut ini :
- Paste kode tersebut tepat di bawah kode <head>

- Simpan Tema
- Lihat hasilnya
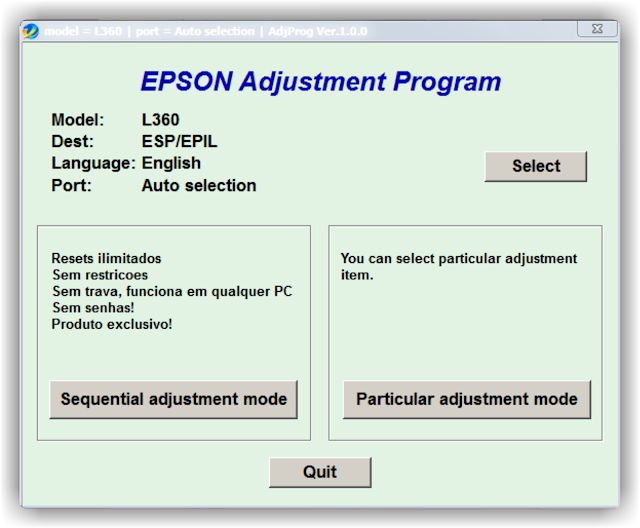
Cara Reset Printer Epson L360
- Pastikan driver printer Epson L360 sudah terinstal.
- Download Resetter Epson L360 di sini.
- Hidupkan dan sambungkan printer ke PC atau Laptop kamu.
- Pastikan Antivirus sudah di nonaktifkan.
- Buka file resseter yang sudah kamu download tadi.
- Jalankan Epson Adjustment.exe
- Agar lebih jelas ikuti petunjuk gambar di bawah ini.
- Klik Select.

- Pada kolom Model Name Pilih L360 → OK.

- Klik Particular adjustment mode.

- Pada Bagian Maintenance pilih Waste ink pad counter → OK.

- Beri Checklist pada Main Pad Counter → Klik Check (akan terlihat berapa point yang sudah di cetak)

- Beri Checklist kembali pada bagian Main Pad Counter → Klik Initialize.

- Klik OK.

- Kamu akan disuruh mematikan printer → Klik OK → Matikan printermu.

- Setelah printer mati kamu akan disuruh menghidupkannya lagi → Klik OK → Hidupkan printermu.

- Proses Reset Printer Epson L360 Sudah Selesai, Printer sudah bisa digunakan.
Printer Epson L360 Gambar tinta dan kertas menyala bergantian/ A printer's ink pad is at the end of its service life.
Printer Epson L360 Gambar tinta dan kertas menyala bergantian/ A printer's ink pad is at the end of its service life.

Permasalahan :
Printer Epson L360 Gambar tinta dan kertas menyala bergantian/ A printer's ink pad is at the end of its service life.
Please contact Epson support.
Penyebab :
Printer Sudah mencapai batas mencetak
Solusi :
Reset Printer
Printer Epson L120 Blink/ A printer's ink pad is at the end of its service life
Printer Epson L120 Blink/ A printer's ink pad is at the end of its service life.

Permasalahan :
Printer Epson L120 Blink/ A printer's ink pad is at the end of its service life.
Penyebab :
Printer Sudah mencapai batas mencetak
Solusi :
Reset Printer
Notebook Asus X200M A problem has been dected and Windows has been shut down to prevent damage to your computer
Notebook Asus X200M A problem has been dected and Windows has been shut down to prevent damage to your computer

- Masuk Ke BIOS
- Klik Advanced
- Cari OS Selection
- Pilih OS yang terinstal di Notebook
- Save and Exit
Cara instal Ulang windows 7 64/32bit agar data tidak hilang
Cara instal Ulang windows 7 64/32bit agar data tidak hilang
- Siapkan CD/ Bootable Windows 7 64/32bit
- Seting Bios Untuk Instal Ulang
- Jika muncul tulisan Press any key.. tekan sembarang tombol di keyboard
- Ikuli langkah_langkah dibawah ini :
- Jika jendela windows sudah muncul Klik Install now

- Beri tanda centang pada I accept the license terms

- Klik Custom (advanced)

- Pilih Disk Partiton (C) → Klik Next

- Muncul peringatan, Klik OK

- Tunggu sampai instalasi windows selesai

- Jika instalasi windows sudah selesai, Isilah data sesuai Perintah
Cara membuat halaman Portrait & Landscape dalam 1 (satu) Dokumen Ms. Word
Cara membuat halaman Portrait & Landscape
dalam 1 (satu) Dokumen Ms. Word

Berikut Langkah-langkahnya :
- Buka aplikasi Ms. Word

- Klik di akhir kalimat ( Jika anda sudah menulis di lembar tersebut )
- Klik Tab Page Layout

- Klik Breaks pada menu Page Setup

- Pilih Next Page pada bagian Section Breaks

- Halaman baru akan muncul

- Klik Orientation

- Pilih Landscape

- Halaman yang baru telah berubah menjadi Landscape, dan halaman pertama tetap dalam posisi Portrait.


